
Hello wonderful audience!
Please see below a downloadable programme for our Winter Concert 2023.
Hello wonderful audience!
Please see below a downloadable programme for our Winter Concert 2023.
At BWSfG we believe that every child in every school has the right to a well-rounded, high-quality music education. Effective teaching of music is paramount in ensuring students experience a rich and balanced curriculum.
At Bullers Wood we seek to ensure all our young people receive an music education that includes the following:
(Finney 2014)
‘This must be done through creative, practical exploration of sounds and music – we are not talking about passive musical appreciation. But it is about understanding, getting to know how music works, and how it therefore conveys meaning.’ (ISM, 2018)
Below is a list of FAQs, but please feel free to ask students and staff any questions you have.

To find out more about what goes on in the music department at BWSFG, please follow us on social media.
I believe the fundamental aim of any KS3 music curriculum is to create musicians. Not GCSE ready YR9s. Not students who know lots about music. Not future adults who appreciate music. But musicians! It is my endeavour to ensure every student in my school feels like a musician, as opposed to a student who does music. Often music is heralded as a unique subject which affords students opportunities to develop transferable skills. However, I would argue that this, as well as all of the above, is a welcome by-product of simply being a musician.
So, how do we get students feeling like musicians? This is perhaps easier said than done, and it’s something I have pondered throughout my teaching career. However, I keep returning to the same answer. Get them making music, as quickly and as much as possible, but also knowing how to make music well! Simply experiencing music is not enough, students must be deeply engaged in its practices, and its practices are practical music making.
To achieve this we must consider the practicalities of pedagogy (how) and curriculum (what and when). How do we get students making music regardless of their starting point and making enough of it (to a good standard, not just experiencing it) so they feel like musicians? I believe there are two ways to help achieve this:
Through accessibility and practice all students can become musicians.
I have written previously about my school’s KS3 music curriculum model here. Therefore, in this post I wish to focus on the implementation of our curriculum and one way in which we make it accessible and provide opportunities to practise. However, just a quick recap to help explain. Our KS3 curriculum is made of twenty-seven musical actions (knowing how) that we believe make a proficient KS3 musician. One of these fundamental skills is ‘playing chords at the correct time, changing fluently’. This, I believe, is one powerful facet of being a musician – and I will write more, in a future post, on why knowing how to play chords on multiple instruments is such an essential part of our KS3 curriculum.
How do we do make learning this skill of ‘playing chords at the correct time, changing fluently’ accessible whilst allowing for ample practice? Enter Musical Futures (MuFu)! For those of you who are not aware (I’m sure lots of you are), MuFu is an award-winning organisation that creates teaching and learning resources for music teachers and students based on the informal learning practices first proposed by Prof. Lucy Green.
Before subscribing to MuFu, still thinking playing chords was a fundamental part of musicianship, I previously spent hours and hours making lead sheets and creating backing tracks for our KS3 students to rehearse with. Now I have hundreds of these instantly at my finger tips, but more importantly so do the students. Having a database of songs ready to go with teaching materials saves hours and allows me to focus on instruction and feedback.
I’ll explain about MuFu in more depth later but below is a video exhibiting their JustPlay:Playalong resources.
Example JustPlay resource:
Mufu can help with students access music through its various scaffolds but how does it allow for practise? This is where we can use it to help sequence a music curriculum. As we know the forgetting curve is harsh and students must experience learning multiple times to truly master knowing how to do something. It is not enough for students to learn how to play an E chord on the guitar in one lesson (easily done) and then move on. It must be practised! Practised to the point where at the end of YR9 any student knows how to play an E chord on command in context of the music. This requires multiple and spaced out experiences of playing this chord. Again, this is something that MuFu can help teachers and students with.

Since using the resources from Musical Futures, and focusing on the pillars of accessibility and practice, I have noticed a keen shift in culture around music in my school. Students whose only experience of music has been in the classroom are choosing to study the subject at GCSE and A level.
I have also had students setting up bands and ensembles – independent of the music department – and using their MuFu logins to prepare and rehearse material. Again, because they can access the music and feel like musicians!
Finally, with MuFu constantly updating their resources with pieces old and new I can update my curriculum or pivot in a single lesson to be responsive, inclusive and challenging.
Hello GCSE Music students!
Below are some are some strategies on how to revise for the Music GCSE Listening and Appraising exam.
In the listening and appraising exam you will need to describe what you are hearing using musical vocabulary. Ways to describe what is happening in music can be divided up into nine elements. To remember these elements we use the acronym MAD T SHIRT.
| Melody | A sequence of single notes |
| Articulation | How a note is played |
| Dynamics | The volume of the music |
| Texture | The layers of the music and how they fit together |
| Structure | The different sections of the music and how they are ordered |
| Harmony & Tonality | Harmony: what chords are used and how they are played Tonality: what key the piece of music uses |
| Instrumentation | What sort of instruments are used |
| Rhythm | How long or short the sounds are and the pattern they make |
| Time & Tempo | Time: how the pulse is counted (how many beats in bar) Tempo: the speed of the music |
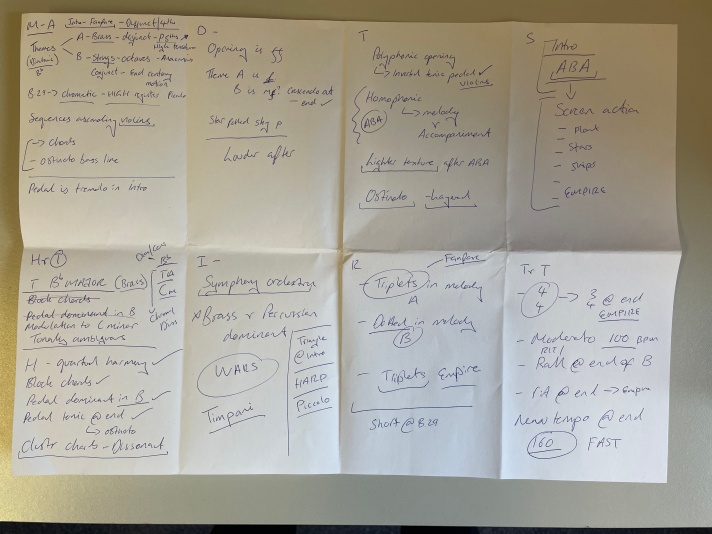
A brain dump is when you write down everything that you can remember about something under timed conditions without notes.
Here is what a completed MAD T SHIRT brain dump for Star Wars looks like:

Here is how to do it:
Make individual flashcards for each element of MAD T SHIRT. The example below is for melody.
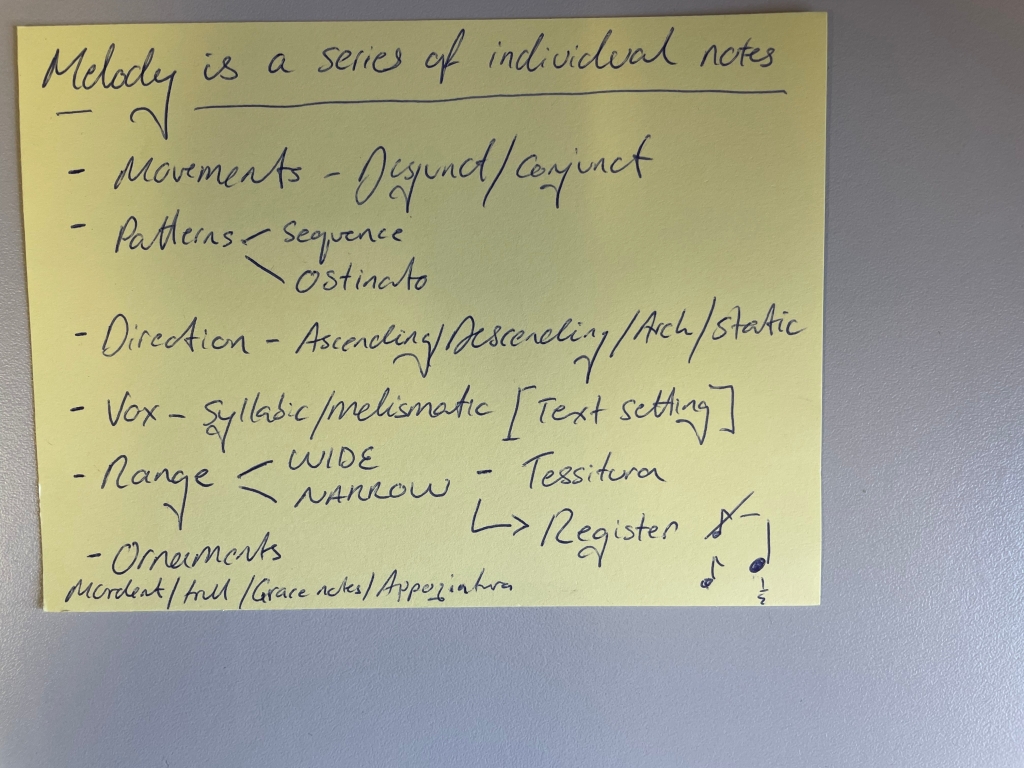
One side should be the name of the element i.e. Texture. On the other side write the definition of the element i.e. how the layers in the music interact and ways to describe it i.e monophonic, homophonic, polyphonic.
To use this for revision try the following:
To test yourself on the key knowledge an concepts from each set work you can complete the MS Quizzes below. You can do this as many times as you would like.
| Quizzes for set works (all have 20 minute timers) |
| Killer Queen |
| Defying Gravity |
| Samba Em Preludio |
| Star Wars |
| Music for a while |
| Brandenburg Concerto |
Here are the revision summaries for each set work for you to check your answers against:
In my department we do a lot of whole-class instrumental teaching. Teaching thirty students all with instruments in their hands can be quite challenging. Routines can help with this and I have written about this here. However, even if we have our classroom arrangements down to a tee, when we send students off to practise and rehearse we can often see students struggle to do what is being asked of them.
To try an explain why this might happen, let’s take a look at a scenario that I have seen in my lessons many times. A scenario where I believe (expert blindness alert!) what is being asked of students is relatively simple. However, when I send students off to practise, one of the first things I hear is “so what are we supposed to be doing?”.

Realising an issue, stopping the class and re-explaining is generally good classroom practice. However, is there anything I could have done differently during my explanation the first time? I modelled in sound. My instructions were simple, concise and given in chunks. There was a visual aid, which students would use in their independent practise. However, all of this is next to useless if they were not paying attention to my explanation.
I think there are two possible reasons we lose students’ attention during explanations.
What can we do to ensure students are attending our explanations? Let’s take a look at our scenario again, but this time I will add some extra steps in bold to address the issues above.
Below is a table of the techniques that I used to try and enhance student attention during my explanation.
| Strategy | Explanation |
|---|---|
| Front load expectations | Adds accountability At the start of my explanation I front loaded my expectations. As adults we often use our experience to know what we should be doing at any given moment. However, students often need clear direction. By asking them to ‘look this way’ and waiting for eye contact, it makes it clear to students this is a phase in the lesson where the attention is on the teacher. I also pre-warned students that there would be questions during the explanation, which they would be required to answer. This accountability measure drives up the participation ratio during explanations. |
| Blank canvas modelling | Helps greater understanding The use of a visualiser allowed me to model in sound whilst also visually showing students what the process to create that sound looked like start to finish. Yes giving them some form of notation as a memory prompt is helpful – but when playing the keyboard students are going to spend most of their time looking at their hands, therefore, it is helpful to show them what their hands will be doing! |
| Deliberate listening through MWSB Qs | Adds accountability/Helps greater understanding We know that learning is invisible. Answering questions is simply a proxy for learning (albeit a good one). I posit that listening is also invisible. We can never truly tell if a student is listening to the music, but via proxies we can tell things about their listening. Answering mini-whiteboard questions whilst listening to music can help us do two things: 1. Direct their attention to parts of the music 2. Ensure there is a reason for students to listen These outcomes do not always need to be garnered through verbal or written responses. It could be a musical response: stamp your foot on beat one or clap when the chords change etc. In the scenario above I did not simply ask students to listen but engage with the chord sequence I was playing. I asked them pick out key things in the music which would help them ground the understanding of my following explanation. |
| Linking to prior knowledge | Helps greater understanding This is possibly the most important tactic to include during explanations. Linking an explanation to knowledge/experience students already have gives context; something for students to build this new information upon. I knew that all my students had learnt what a chord is, how to build major and minor chords and where the notes on the keyboard are. In the case of this explanation, through cold calling I drew out students prior knowledge about chords and then facilitated students making connections between this and my explanation. |
| Checking for understanding (CFU) | Adds accountability CFU is an essential part of any explanation. It’s used to see what students have understood about the instructions given. By asking students to think-pair-share the process of playing an E minor, it not only gives them an opportunity to think through the whole process, it also allowing me gauge whether or not the students have understood what they will be doing at their instrument. Again CFU in music can and mostly should be in sound. The example above is asking students to clap when the chords change, showing me that they understand the harmonic rhythm of the music they are about to practise. In the next phase of the lesson, where students had three minutes of independent practise, I would CFU by asking the whole class of sections of it to play the chord sequence. |
Constructing and delivering an explanation like this takes time. Probably more time than just showing students. In a subject like music, where curriculum time is gold dust, wouldn’t it be easier to just show them and circulate to help those who didn’t understand the first time? Possibly. Music again, in contrast to some other subject, will have classes a wide range of ability levels and prior knowledge. For some students the notation I displayed would be enough, for others it’s completely incomprehensible. A balance must be struck. However, we must not allow expert blindness to led to assume that all students know what they should be doing.
I hope everyone is enjoying their Easter break. The spring term is often the most gruelling and for music teachers, with the recording, administration and the marking of coursework, it can feel like a particular sharp pinch point in the academic year. The two-week spring break is welcome and definitely needed. Why then every year do so many teachers give up some if this much needed time off to run revision sessions for exam classes? Many don’t and I must say I do understand those who opine that these sessions are mostly worthless to students. However, every year I find myself signing up to run one.
Students need to revise learning multiple times to combat the forgetting curve. One solitary session is probably not going to help all that much in practising the retrieval of key information. Furthermore, the content for qualifications is often so vast that this one session surely cannot cover anything useful in the required detail. These are the thoughts I have often had before, during and after running such one-off revision sessions.
So this year I thought I would take a different tack. Instead of running and revision session; I would run a session on revision. Yes there is a difference! Instead of just covering content and exam practise with students, I planned to explicitly teach them how to revise for the music exam. I would weave some revision into this obviously. But I wanted students to come away with a realistic and helpful vision of what revision for music looks like. What should students actually be doing to help them prepare for the exam. Therefore, this year’s session became lets revise together whilst I explicitly teach you how to revise for music.
I have many misgivings about the GCSE Music listening and appraising exam but I am going to park those for this blog.
Fundamentally, for this exam students need to be able to do two things:
I often share this with my students, making the point that this listening exam requires students to use their memory to describe what they are hearing in the moment. Therefore, it would be beneficial for my revision session to give students tasks that would aid memory and encourage them to use this to describe music.
My decision to change the approach of my revision session came through reading a wonderful thread on memory by Sarah Cottingham.

My biggest take away from this was signalling to the brain that the information required to answer exam questions is not available in the environment. In the exam the only things students will have is a blank space to write in and a pen (also their brain/memory). Therefore, revision needs to emulate this in order to convince the brain that this information is worth encoding into the long term memory.
There is one caveat to this. Music students do have some extra information in their environment. Music. However, students with higher levels of prior knowledge will have a lower cognitive load when answering questions and should therefore be able to focus more on analysing the music. In other words, if students have strong memories of concepts and vocabulary they are more able to answer the question based on other sensory information like the extract of music playing.
One thing that I have been convincing students to do is revise with a blank canvas. I have used a lot of blank canvas modelling in lessons but had thought less about this approach when it comes to revision. However, revising from a blank canvas makes complete sense when we think about emulating that exam experience. Funky Pedagogy has spoken about the benefits of using a blank canvas for revision. I particularly like the idea of targeted brain dumps.

I thought I would try some with my year 11 class, in this session on how to revise music, in addition to some other memory strengthening tasks.
This is what my session on revision looked like by the end:

Below is a list of music revision tasks that I explicitly taught my year 11s to do. They seemed to find it helpful and I hope you do to!
All of the above revision activities I did with the students during this session. I instructed them through the process, questioning them as we went to check for understanding. I then gave them independent time to complete the task. We did not cover masses of content but hopefully they left with a more concrete and confident ideas on how to revise for the music exam.
Routines are important in teaching. Adopting consistent classroom routines is one way to help ensure all students receive the very best teaching [Burden 2003]. They allow for:
As music teachers we are presented with numerous extra challenges that make achieving the above difficult. However, I would posit the most difficult and equally the most important is holding students’ attention. Students must be paying attention in order to learn, otherwise what is it all for. “Routines are a powerful tool for learning because they support the direction of attention” [Argyropulo-Palmer 2022].
The challenges we face as music teachers can be describe as:
Below I wish to talk through each issue that I have experienced and the routines that have helped students and I to navigate these. Some of these will of course tie into routines that are beneficial for all classrooms. This is rather a long post, feel free to dip in an out of each section!
Music lessons should involve noise, and lots of it, however, his can be difficult to manage. Bringing back the attention of thirty students all taking part in discussions can be tough. However, thirty students all playing guitar simultaneously can prove even more demanding. In my department we use a signal for silence to attract the attention of all students. This involves tapping lightly on an agogo, cow bell or wood block and then holding the instrument in the air. This saves music staff having to shout over the volume of instrumental playing but also provides a distinctive signal for students to stop and listen. Whilst non auditory signals can be good too, sometimes the layout of music classrooms, like mine, means that not all students can see the teacher at all times when completing practical music making.
Embedded through explicit teaching and practise from lesson one, this routine is explained to students as:
This of course is a variation on signal, pause, insist [Walkthrus 2022]. Whilst obviously the signal part is crucial, both the pause and insist stages need to be followed. The pause give students time to register the signal and follow the routine. After allowing sufficient time, teachers need to address any students not following the routine. I tend to do this three ways. Firstly, sustained eye contact. Secondly, parallel praise; ‘Thank you everyone who followed our classroom routine. Well done this this side of the room who have given me their attention‘. This highlights to students what the expectations are. Thirdly, questioning; ‘What do I need everyone in the class to do when I ring the bell… Susan?’. Typically, Susan was the one still talking or playing, but the language of ‘what do I need everyone to do’ makes it apparent to Susan and everyone else what I am insisting on after signalling for silence, without overtly calling Susan out.
We do a lot of whole-class instrumental teaching in my department. This often involves giving out thirty instruments, which can eat away at lesson time. It also means students typically have instruments in their hands whilst I am instructing/modelling and need them to listen attentively. Furthermore, my classroom is small and thirty students holding thirty guitar takes up a lot of room. To combat the above three issues, again I explicitly teach the routines required for whole-class instrument teaching and students practise them, a lot!
Handing out instruments
To avoid lost learning time, whilst instruments are handed out, I give students a warm up to do in pairs. Students complete this whilst I invite a row up at a time to collect their instruments. This warm up is always related to whatever music we will be playing. It could any of the following:
Once students receive their instruments, depending on the lesson, they either put their instrument in rest position, start to recap the material from our last lesson or complete a warm up. This all means that student are directing their attention towards learning, rather than using the instruments inappropriately or simply waiting.
Rest position
Rest position is a very common phrase in my classroom. It explicitly signals to students that they should not be playing and be holding the instrument in a safe manner. Before instruments are handed out I will visually model this for students with the instrument.
The script for modelling sounds a little like this:
‘When you receive your instrument place it immediately in rest position. This means lay the ukulele/guitar flat on your lap with the strings facing down [or have both hands around both drum stick or turn the volume of your keyboard down and put your hands in your lap]. When you hear my signal for silence please do this straight away. If you demonstrate that you cannot do this safely the instrument will be taken away from you so that you can focus on my teaching‘.
Students, of course, will always want to fiddle with instruments. Making students have their instruments in rest position clearly communicates that now is the time for listening. This routine goes some way to guarding against this. However, with routines like this, it is not good enough to simply explain. Teachers must ensure that students know what is expected of them. So before moving on there must be some form of checking for understanding (CFU). This is as easy as questioning students or getting some students to demonstrate. This excellent blog post by Adam Boxer delineates why CFU is crucial after giving instructions.
Instruments can be dangerous and are fragile
Guitars and ukuleles have pointy bits. Drum sticks, also pointy! Keyboards are heavy etc. Having students handling instruments they are not used to using, in an enclosed space, with twenty-nine other students can certainly be challenging; both from safety and maintenance perspectives. Again, modelling how to use the instrument safely is paramount. It may sound obvious but children need explicit instruction in how to use unfamiliar equipment. For example: carry the instrument like this, do not play the keyboard with the palm of your hand, drums sticks should only ever come into contact with your chair (for chair drumming!). Again, CFU is important. This means expectations are clear and any student who does not follow these routines can be sanctioned appropriately.
Instruments are fragile and ensuring student know how to handle them safely and insisting on this means they do not get damaged. Budgets are always tight; if an instrument breaks they can often not be repaired and that means students missing out. To also help students I place them in a seating plan for practical work, students are either assigned a particular keyboard, made to move their chair so that they guitar does not accidentally clatter against their partner’s or given a taped off zone to work in as a group (more on this later).
Music lessons often involve moving around the classroom. Whether this is collecting and returning instruments, moving to rehearsals spaces or operating instruments, students can find navigating these manoeuvres challenging. Especially as most lessons during their school day require them to remain stationary. I have already spoken about collecting instruments, but what about once students have their equipment and are engaged in practical music making? I have a couple of solutions to help students navigate this.
Music making seating plans
Of course we use seating plans for our lessons, however, we often have additional seating plans for the whole-class instrumental tuition/playing phase of the lesson. When given the choice students will also want to sit with their friends, sometimes this can be beneficial to progress, but sometimes (or quite often) it is not. We’ve found that saying ‘collect your guitar and find a seat’ or ‘choose a keyboard’ does not work. Like any other lesson students are given a seat to practise their instrument in and are expected to remain there. The formation of the room may look different depending on which instrument we are using, but before giving out instruments students are told their ‘music making seat’ and move there ready to learn.
Group work
With a lack of break out spaces available, during group work we tend to have many groups working in the same room simultaneously. To ensure students remain with their group, we mark out zones (Covid 19 flashback!) in the room with masking tape along the floor. Students must remain in their groups’ zone. One student in each group is chosen as the spokesperson. This student may leave the zone but only to find the teacher to ask for assistance, resources etc. Any other student outside their zone can be sanctioned in line with the whole-school policy for leaving their seat.
Packing away
The last scenario which requires students to move around the room is packing up and returning equipment. Getting this routine right is crucial. Again, instruments need to be treated with respect and the classroom needs to be returned to an organised condition for the next class. We employ a couple of routines to help achieve this. Firstly, we choose instrument monitors who help ensure the instruments go away safely. Instead of thirty students trying to hang their ukuleles at the same time or students all trying to return their drum sticks at the same time, we select two/three students who are charged with returning equipment. Secondly, we use an instructional piece of music to which students tidy the room to. It acts as a signal for this transitional point of the lesson and gives students one and half minutes to reset the room. Again what needs to happen in this minute and half is explicitly taught ‘keyboard guides go in this box, chairs returned to starting position, stand in front of your chairs ready to leave’ etc.
Something else that often causes students to struggle with attention in music is the fact that it feels different to many of their other lessons. Of course this sense of variety can help our subject stand out, however, it can also make the lesson difficult to navigate for students. Many factors contribute music lesson looking a little different. In my department’s music lessons we have no desks, no books (we do very little writing, other than on mini whiteboards), students move around the room, we make a lot of noise and often rehearse in pairs and groups. Lots of these factors can make lessons very exciting for students (especially YR7!), but again it can make it difficult for students to regulate themselves. Students can think things like ‘well, I make noise in this lesson, it’s no big deal if I call out’ or ‘I move around in music, so I can leave my seat when I feel it like’. However, the music classroom still needs to be an ordered atmosphere conducive to learning.
At my school we focus all rules and routines through the prism of our two core values: mutual respect and ready to learn. Therefore to set the tone for this and reinforce that even in music, a lesson that looks and feels different, we still adhere to our core values, we use our departmental threshold routine. This involves the following:
It might seem simple, it may seem a little draconian, it could even feel like a waste of lesson time (why not just let each student enter the classroom as soon as each of them arrives). However, I believe this threshold routine truly ensures that students are ready to learn and insists of them showing mutual respect when they enter the classroom. It demonstrates that music lessons are the same as any other where students are ready to and learn and show mutual respect.
This routine is reinforced by the music classroom rules. In my first lesson with a class, after modelling the threshold routine for the first time, I show the students my classroom rules. These are my non-negotiables for every students to have a safe and productive lesson. For the first couple of lessons these rules are displayed on the board as students enter.

As music teachers we are acutely aware of how little curriculum time we have. Lessons are typically a week or even two weeks apart. Students have a long time to forgot what was learnt last lesson, especially if it was a new concept, skill or material. We must direct students’ attention towards the previous learning. This means retrieval and recapping must be integral parts of our teaching. However, retrieval has seen some lethal mutations in recent years taking on the form of ‘do now’ starters, which can be incredibly helpful to students, but must be adapted to ensure they fit the individual nature of the subject. Regarding this, I saw an interesting tweet from former HMI and Ofsted’s Subject Lead for Music, Mark Phillips.

This is an incredibly powerful point. Music is music. Students should be in no doubt that when the lesson begins, they are in a music lessons. To achieve this our lessons typically start with one of the following:
Listening to music with mini whiteboard questioning.
This is important as our lessons focus on oracy, therefore it is paramount that students activate prior knowledge to access the learning. They need to understand the key vocabulary and how it relates to the music or instrument we are playing. If I am going to be using the word tempo consistently in a lesson I want to know that all students understand what is meant by tempo before we start (a future blog post is in the works on this!). Example below:

Recall the new repertoire that we are studying by singing it.
Exactly what is says on the tin. There is no better what to internalise music than to sing it. It is accessible to all students and also provides them with a sound model which they can use for the whole lesson. It doesn’t have to be the lyrics or melody of a song. We often sing the riffs. Below is an example of Take Five by Dave Brubeck:

A short instrumental warm up.
Often lessons can start with the instruments being handed out and students completing a short warm to revise key concepts and skills. In the example below students play an ascending E minor pentatonic scale using from tab notation. The gives students a chance to revise how tab notation works; which string in the diagram is which on the guitar, what the numbers mean etc. It also gives students time to practise their picking technique and finger placement.

Whilst the task may differ both students and teachers in our department are aware that every lesson begins with a recap; an activity which activates the prior knowledge required for the lesson ahead.
This year I have personally been focusing on the start of each lesson. As a school we have returned to single lessons for most KS3 subjects. This means I have a narrow 50 minutes to help students learn. Therefore, holding students’ attention is paramount. This focus on attention has lead me to ask not only ‘what students should be learning’ but ‘how to get them to pay attention to the learning’! Routines can help with this as they both support the direction of attention by “reducing the volume of information for the thinking brain to process” and “by creating social norms that make it more likely thats students will attend to the learning” [Argyropulo-Palmer 2022].
Argyropulo-Palmer, A-M. (2022) Exploring the evidence base: The role of routines in creating an effective learning environment. Available at: https://my.chartered.college/impact_article/exploring-the-evidence-base-the-role-of-routines-in-creating-an-effective-learning-environment/ (Accessed on: 13/02/2023)
Burden, P. R. (2003) Classroom management: Creating a successful learning community. New York: John Wiley & Sons, Inc.
Walkthrus (2022) ‘Gaining focused attention on a signal’, Walkthrus. Available at: https://sites.google.com/view/walkthrusfullpackage/what/behaviour-relationships/signal-pause-insist (Accessed on: 13/02/2023)
